VR 采集(Pico)
本页对应 OpenArmX + Pico4 Ultra 的 LeRobot 数据采集流程。
🧩 硬件清单
| 设备 | 数量 | 说明 |
|---|---|---|
| OpenArmX 双臂机器人 | 1 台 | 从动端,执行遥操指令 |
| RealSense D405 | 2 个 | 左右手腕相机 |
| RealSense D435 | 1 个 | 头部相机 |
| Pico4 Ultra | 1 台 | VR 遥操作设备 |
| USB 3.0 高速拓展坞(≥3 口) | 1 个 | 保证相机带宽 |
| 千兆路由器 + 千兆网线 | 各 1 | 双机通信 |
| 采集主机(工控机) | 1 台 | 机器人 + 相机端 |
如果采用本地服务器进行训练的话,也可以在本地服务器直接接收数据,只需要两台主机在同一 wifi 下。
⚠️ 采集前安全检查
- 启动双臂前确认 CAN 板已启动(蓝灯常亮,绿灯表示未启动)
- 启动后 CAN 板蓝灯闪烁属于正常现象
- 轻晃机械臂,确认每个关节都有阻力(电机使能成功)
- 远离易燃、易爆、腐蚀性危险品
- 采集过程中与机器人保持安全距离
采集端(工控机)
终端 1:启动双臂机器人
cd ~/openarmx_ws
source install/setup.bash
ros2 launch openarmx_bringup openarmx.bimanual.launch.py \
  control_mode:=mit \
  robot_controller:=forward_position_controller \
  use_fake_hardware:=false
终端 2:启动 Pico 桥接
cd ~/openarmx_ws
source install/setup.bash
ros2 run openarmx_teleop_bridge_vr openarmx_teleop_bridge_vr_node
终端 3:启动 IK 逆解(VR 遥操作)
cd ~/openarmx_ws
source install/setup.bash
ros2 launch openarmx_teleop_vr teleop_vr.launch.py
终端 4:启动三路相机
查询相机序列号(输出按左、中、右顺序排列,使用 Serial Number 字段,不要用 Asic Serial Number):
| D405 | D435 |
|---|---|
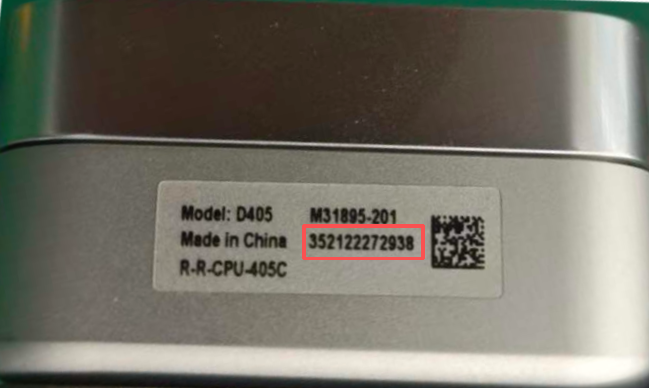 |
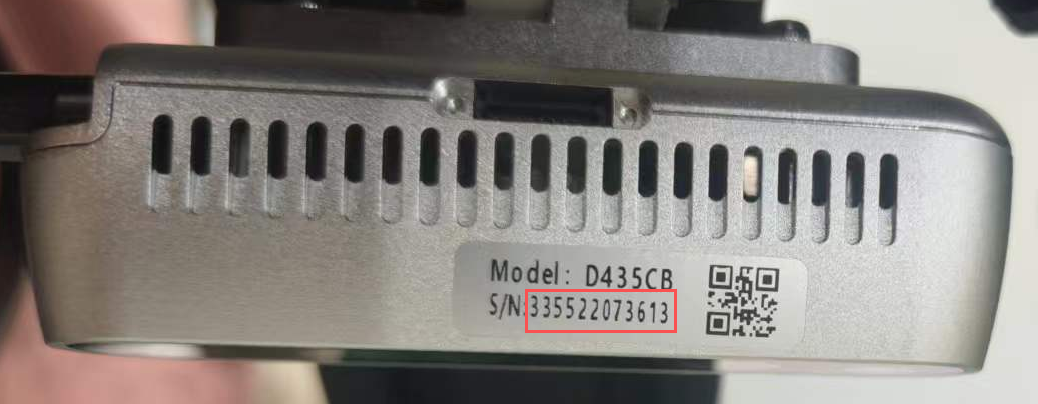 |
rs-enumerate-devices | grep "Serial Number"
启动相机:
cd ~/openarmx_ws
source install/setup.bash
W=424; H=240; FPS=30
ros2 launch openarmx_lerobot camera_publisher.launch.py \
  width:=$W height:=$H fps:=$FPS \
  cam_left_serial:=左手序列号 cam_left_type:=D405 \
  cam_right_serial:=右手序列号 cam_right_type:=D405 \
  cam_head_serial:=头部序列号 cam_head_type:=D435
width/height/fps在采集、训练、推理三阶段必须完全一致。
终端 5:启动 LeRobot 采集
先进入 LeRobot 环境,再执行录制命令:
W/H/FPS用于配置采集时的相机分辨率与帧率(例如W=640; H=480; FPS=30)。- 这里的
W/H/FPS必须与相机发布节点camera_publisher.launch.py的width/height/fps完全一致。 - 修改相机发布节点的 W/H/FPS 后,请同步将数据采集命令中的 W/H/FPS 改为一致;否则相机格式不匹配会导致报错。
🚨 关键约束:
采集 W/H/FPS=相机发布 width/height/fps。 默认保存路径:~/.cache/huggingface/lerobot/local如整批采集出现问题,删除
local目录下同名文件夹后重新运行采集。如不删除则会报错,采集失败!
通用模板:
lerobot-env
W=424; H=240; FPS=15
HF_HUB_OFFLINE=1 lerobot-record \
  --robot.type=openarmx_follower_ros2 \
  --robot.cameras="{cam_left: {type: ros2, image_topic: /cam_left/color/image, depth_topic: /cam_left/depth/image, use_depth: true, width: $W, height: $H, fps: $FPS}, cam_right: {type: ros2, image_topic: /cam_right/color/image, depth_topic: /cam_right/depth/image, use_depth: true, width: $W, height: $H, fps: $FPS}, cam_head: {type: ros2, image_topic: /cam_head/color/image, depth_topic: /cam_head/depth/image, use_depth: true, width: $W, height: $H, fps: $FPS}}" \
  --teleop.type=openarmx_leader_ros2 \
  --dataset.repo_id=local/你的数据名称 \
  --dataset.single_task="你执行的任务名称" \
  --dataset.num_episodes=采集的总组数 \
  --dataset.episode_time_s=每组时长秒数 \
  --dataset.reset_time_s=组间重置时长秒数 \
  --dataset.push_to_hub=false \
  --display_data=true
示例:
lerobot-env
W=424; H=240; FPS=15
HF_HUB_OFFLINE=1 lerobot-record \
  --robot.type=openarmx_follower_ros2 \
  --robot.cameras="{cam_left: {type: ros2, image_topic: /cam_left/color/image, depth_topic: /cam_left/depth/image, use_depth: true, width: $W, height: $H, fps: $FPS}, cam_right: {type: ros2, image_topic: /cam_right/color/image, depth_topic: /cam_right/depth/image, use_depth: true, width: $W, height: $H, fps: $FPS}, cam_head: {type: ros2, image_topic: /cam_head/color/image, depth_topic: /cam_head/depth/image, use_depth: true, width: $W, height: $H, fps: $FPS}}" \
  --teleop.type=openarmx_leader_ros2 \
  --dataset.repo_id=local/openarmx_dataset \
  --dataset.single_task="Teleop OpenArmX robot" \
  --dataset.num_episodes=100 \
  --dataset.episode_time_s=60 \
  --dataset.reset_time_s=5 \
  --dataset.push_to_hub=false \
  --display_data=true
建议先采集 10~20 组验证链路正常,再批量采集。
效果更好需不少于 50 组。
默认保存路径:~/.cache/huggingface/lerobot/local
⌨️ 采集快捷键
| 按键 | 操作 |
|---|---|
→ 右方向键 |
结束并保存当前 episode,进入重置阶段 |
← 左方向键 |
丢弃当前 episode,重新录制 |
Esc |
停止录制并退出 |
注意:示例中展示的单个数据采集时长是60秒,在60内完成采集任务可按 → 右方向键保存数据,如没有按则等到60秒后自动保存。如数据采集错误可按 ← 左方向键丢弃当前的错误数据,但一定要在 60 秒之前丢弃数据否则错误数据将会自动保存。而且数据采集阶段是不能停止的!如数据量比较大,建议多人交替采集!
🔍 常用参数说明
| 参数 | 说明 |
|---|---|
--dataset.repo_id |
数据集名称,如 local/openarmx_dataset,每次新任务必须修改 |
--dataset.single_task |
任务描述文字 |
--dataset.num_episodes |
总回合数 |
--dataset.episode_time_s |
每回合最大时长(秒) |
--dataset.reset_time_s |
每回合间重置场景时长(秒) |
--display_data |
是否开启 Rerun Viewer 可视化 |
--dataset.root |
自定义数据保存目录(默认在 HuggingFace 缓存目录) |
--dataset.vcodec |
视频编码器,可选 h264、hevc、libsvtav1 |
📷 相机参数参考
可用分辨率 / 帧率组合
Intel RealSense D405
| 分辨率 | 支持帧率 |
|---|---|
| 1280 × 720 | 5, 15, 30 |
| 848 × 480 | 5, 15, 30, 60, 90 |
| 640 × 480 | 5, 15, 30, 60, 90 |
| 640 × 360 | 5, 15, 30, 60, 90 |
| 480 × 270 | 5, 15, 30, 60, 90 |
| 424 × 240 | 5, 15, 30, 60, 90 |
Intel RealSense D435 / D435i
| 分辨率 | 支持帧率 |
|---|---|
| 1920 × 1080 | 6, 15, 30 |
| 1280 × 720 | 6, 15, 30 |
| 848 × 480 | 6, 15, 30, 60, 90 |
| 640 × 480 | 6, 15, 30, 60, 90 |
| 640 × 360 | 6, 15, 30, 60, 90 |
| 480 × 270 | 6, 15, 30, 60, 90 |
| 424 × 240 | 6, 15, 30, 60, 90 |
标配工控机 + 标配拓展坞下,三相机稳定上限为
640×480 @ 30fps。默认推荐424×240 @ 15fps,带宽占用更低更稳定。
颜色参数调节
在 camera_publisher.launch.py 启动时可附加以下参数(* 替换为 cam_left / cam_right / cam_head):
| 参数 | 说明 | 范围 / 取值 |
|---|---|---|
cam_*_color_auto_exposure |
自动曝光 | true / false / unset |
cam_*_color_exposure |
手动曝光 | 1..10000 |
cam_*_color_gain |
手动增益 | 0..128 |
cam_*_color_auto_white_balance |
自动白平衡 | true / false / unset |
cam_*_color_white_balance |
手动白平衡 | 2800..6500 |
cam_*_color_brightness |
亮度 | -64..64 |
cam_*_color_contrast |
对比度 | 0..100 |
cam_*_color_saturation |
饱和度 | 0..100 |
cam_*_color_sharpness |
锐度 | 0..100 |
只写
cam_*_color_exposure或cam_*_color_gain时,launch 会自动补cam_*_color_auto_exposure:=false;只写cam_*_color_white_balance时自动补cam_*_color_auto_white_balance:=false。
- 先小批量(10~20 组)验证整体链路,再进行长时采集
- 保持相机曝光和机位一致,减少训练分布漂移
- 每个任务单独建
repo_id,便于后续训练与复现 - 相机
width/height/fps三处必须一致:相机发布 → 采集 → 推理